30,000 instances were found exposed. Here are the seven security steps that keep yours off that list.
A security researcher ran a Censys scan in February 2026. Found over 30,000 OpenClaw instances exposed on the public internet without authentication. No password. No access control. Anyone who found the IP and port could send messages to the agent, read conversation history, and potentially access everything the agent had access to.
Most of those instances weren't hacked. They were misconfigured. The owners followed a setup tutorial, got the agent running, and never thought about security. The default gateway binding (0.0.0.0 on some configurations) faced the open internet. No firewall blocked the port. No SSH hardening limited access.
If you're running OpenClaw on a VPS, this guide walks you through the seven security steps that prevent your instance from being one of those 30,000. Total time: about 30 minutes. Each step is independent. Do them in order. Skip none.
Step 1: Bind the gateway to loopback (5 minutes)
This is the single most important security step. If you do nothing else on this page, do this.
OpenClaw's gateway is the HTTP server that handles all connections to your agent. If it binds to 0.0.0.0, it accepts connections from everywhere: your machine, your local network, and the entire internet.
Change the gateway bind setting to "loopback" in your openclaw.json. This restricts the gateway to only accept connections from the local machine (127.0.0.1). Nobody on the internet can reach it directly.
But how do I access it remotely? SSH tunneling. You create an encrypted tunnel from your personal machine to the VPS and forward the gateway port through it. This gives you remote access without exposing the gateway to the public internet.
GitHub Issue #5263 requested changing this default to loopback. It was closed as "not planned." So the responsibility falls on you. For the detailed gateway guide including SSH tunnel setup, our gateway post covers the full configuration.

Step 2: Disable password SSH and use key-based authentication (5 minutes)
Default VPS setups allow password-based SSH login. This means anyone who guesses your password (or brute-forces it) gets root access to your server and everything on it, including your OpenClaw agent, your API keys, and your conversation history.
Switch to SSH key authentication and disable password login entirely. Generate an SSH key pair on your personal machine. Add the public key to the VPS. Edit the SSH daemon configuration to disable password authentication. Restart the SSH service.
This is standard server hardening, not OpenClaw-specific. But it matters more for OpenClaw because the agent stores API keys, model credentials, and potentially sensitive conversation data. A compromised server means compromised credentials.

Step 3: Configure the firewall (5 minutes)
A firewall controls which ports accept incoming connections. Without one, every port on your VPS is accessible from the internet.
Enable UFW (Uncomplicated Firewall) and allow only the ports you need. For most OpenClaw setups, you need SSH (port 22) and nothing else externally accessible. The gateway port should be blocked from external access because you're accessing it through the SSH tunnel from step 1.
If you're running a web server alongside OpenClaw (for a reverse proxy, for example), allow port 443 (HTTPS). Block everything else.
The firewall rule is simple: if a service doesn't need to be reachable from the internet, block it. OpenClaw's gateway doesn't need to be reachable from the internet because you access it through SSH tunneling.
Steps 1-3 take 15 minutes total and prevent the exact exposure that affected 30,000+ instances. Gateway to loopback. SSH to keys only. Firewall on. These three changes are non-negotiable for any VPS deployment.

Step 4: Vet every skill before installation (ongoing)
The ClawHavoc campaign found 824+ malicious skills on ClawHub, roughly 20% of the entire registry. Cisco independently discovered a skill performing data exfiltration without user awareness. The most popular malicious skill had 14,285 downloads before removal.
Server hardening protects you from external attackers. Skill vetting protects you from the code you install yourself.
Before installing any ClawHub skill: check the publisher's identity and history, read the source code for suspicious network calls and file access outside the skill's workspace, search community reports for the skill, and test in a sandboxed workspace for 24-48 hours before deploying to production.
For the complete skill audit process including VirusTotal scanning, our skills guide covers the vetting workflow.

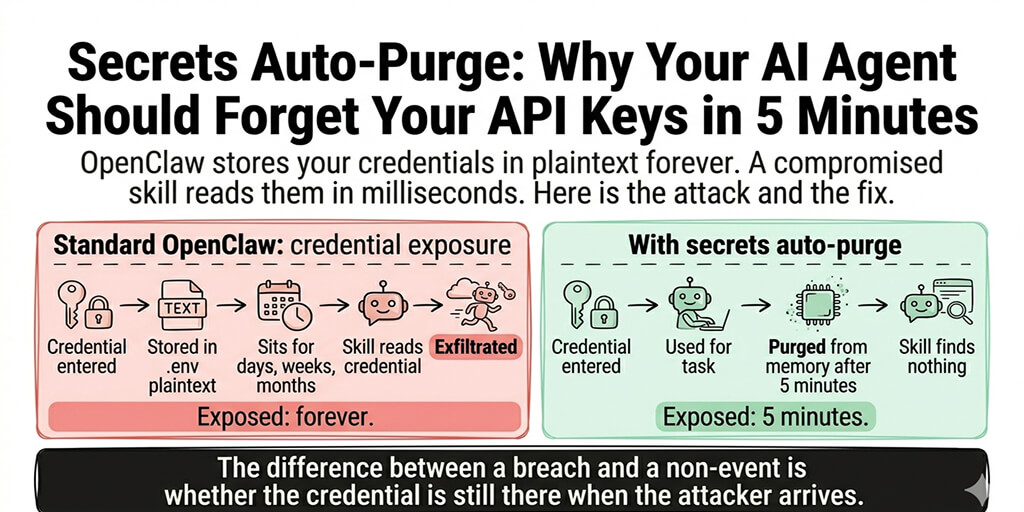
Step 5: Protect your API credentials (5 minutes)
OpenClaw stores API keys in your config file. On a default setup, that file is readable by any process on the server. A compromised skill or a server-level breach exposes every API key.
Three protections for credentials: Store API keys as environment variables instead of plaintext in the config file. Set file permissions on the config file to be readable only by the OpenClaw process user. Rotate API keys quarterly, or immediately after any security incident.
CrowdStrike's enterprise security advisory specifically flagged credential exposure as a top risk for self-hosted OpenClaw deployments. The config file is the single biggest target because it contains every model provider key in one place.

Step 6: Set iteration limits (2 minutes)
Without iteration limits, a single buggy skill can trigger an infinite retry loop. Each retry is an API call. An unlimited loop can burn through $50-100 in API credits in under an hour and trigger rate limits that take your agent offline.
Set maxIterations to 10-15 in your OpenClaw config. This caps how many sequential tool calls the agent makes per turn. If a skill errors 10 times in a row, the agent stops trying instead of running indefinitely.
Also set monthly spending caps on every model provider dashboard at 2-3x your expected monthly usage. These are your safety nets. They don't change normal operation. They prevent the catastrophic failure scenario.
For the complete cost protection setup including model routing and spending caps, our cost guide covers the financial safety configuration alongside cost optimization.

Step 7: Stay current with security patches (ongoing)
CVE-2026-25253 was a one-click remote code execution vulnerability with a CVSS score of 8.8. It affected all OpenClaw versions before v2026.1.29. The patch was available within days of disclosure. Instances that hadn't updated remained vulnerable.
Apply security patches immediately. Not next week. Not when it's convenient. Immediately. For the safe update process including backup and rollback, our update guide covers how to update without breaking your setup.
Feature updates can wait. Security patches can't. Monitor OpenClaw's GitHub repository and Discord for security announcements. When a CVE drops, update within 24 hours.
Security isn't a one-time setup. Steps 1-3 and 5-6 are configure-once. Steps 4 and 7 are ongoing. Skill vetting happens every time you install something new. Update patching happens every time a security fix drops. Build these into your monthly routine.

The security checklist (bookmark this)
Here's everything from this guide as a quick-reference checklist.
Configure once (30 minutes):
Gateway bound to loopback (127.0.0.1 or "loopback" in config). SSH configured for key-based authentication, password login disabled. UFW firewall enabled, only SSH port open externally. API keys stored as environment variables, not plaintext in config. Config file permissions restricted to OpenClaw process user. maxIterations set to 10-15 in OpenClaw config. Spending caps set on every model provider dashboard.
Ongoing:
Every new skill vetted before installation (publisher check, source code review, sandbox test). Security patches applied within 24 hours of disclosure. API keys rotated quarterly. Gateway and firewall settings verified after any OpenClaw update (some updates reset defaults).
If managing gateway security, firewall configuration, SSH hardening, skill vetting, and update patching feels like more security work than you signed up for, Better Claw handles security at the infrastructure level. Docker-sandboxed execution. AES-256 encrypted credentials. Gateway security locked down by default. $19/month per agent, BYOK. The security configuration is built into the platform because we saw what happens when it's left to individual users.
The uncomfortable reality
Here's what nobody tells you about securing OpenClaw on a VPS.
You can follow every step in this guide perfectly and still have a security surface that's wider than most web applications. Your agent has file system access, network access, the ability to execute code, and connections to your communication platforms. The attack surface isn't just the server. It's everything the agent can reach.
The OpenClaw maintainer Shadow put it bluntly: "if you can't understand how to run a command line, this is far too dangerous of a project for you to use safely." Even if you can run a command line, the security responsibility is real and ongoing.
The seven steps in this guide reduce the surface dramatically. They prevent the casual exposure that affected 30,000+ instances. But they don't eliminate risk. They manage it. If your use case involves sensitive data, customer information, or business-critical operations, treat your OpenClaw VPS with the same security rigor you'd apply to any production server handling sensitive data.
If you want the security handled automatically, give Better Claw a try. $19/month per agent, BYOK with 28+ providers. Docker-sandboxed skill execution means compromised skills can't access the host. AES-256 encrypted credentials mean API keys can't be extracted. Gateway security is locked down by default. You bring the SOUL.md. We bring the security perimeter.
Frequently Asked Questions
How do I secure OpenClaw on a VPS?
Seven steps: bind the gateway to loopback (127.0.0.1), switch SSH to key-based authentication, enable UFW firewall with only SSH open externally, vet every skill before installation, protect API credentials (environment variables instead of plaintext), set maxIterations to 10-15, and apply security patches within 24 hours. The first three steps take 15 minutes and prevent the exact exposure that affected 30,000+ OpenClaw instances found without authentication.
What is the biggest security risk with self-hosted OpenClaw?
The gateway binding. OpenClaw's gateway defaults to 0.0.0.0 on some configurations, which accepts connections from the entire internet. This means anyone who finds your IP and port can interact with your agent without authentication. Changing the bind setting to loopback (127.0.0.1) and using SSH tunneling for remote access is the single most important security step. 30,000+ instances were found exposed because of this misconfiguration.
How long does OpenClaw VPS security hardening take?
The initial configuration takes approximately 30 minutes: gateway binding (5 min), SSH key setup (5 min), firewall configuration (5 min), credential protection (5 min), and iteration limits (2 min). Ongoing security maintenance adds 1-2 hours per month for skill vetting (per new skill installed) and security patch application (as CVEs are disclosed). Managed platforms like BetterClaw handle these protections automatically.
Does securing my VPS protect against malicious ClawHub skills?
Partially. Server hardening (gateway, firewall, SSH) protects against external attackers. It does not protect against malicious code in skills you install. The ClawHavoc campaign found 824+ malicious skills on ClawHub (~20% of the registry). You must vet every skill separately: check the publisher, read the source code, test in a sandbox. Docker-sandboxed execution (available on managed platforms like BetterClaw) contains compromised skills so they can't access the host system.
Is self-hosted OpenClaw secure enough for customer-facing use?
With all seven hardening steps applied and ongoing maintenance (skill vetting, patching), yes. Without them, definitively no. CrowdStrike's enterprise advisory flagged unprotected self-hosted deployments as the primary risk. The key consideration: self-hosted security is your responsibility. Every misconfiguration is your exposure. Managed platforms include these protections by default, removing the possibility of accidental misconfiguration.
Related Reading
- OpenClaw Gateway Guide — Deep dive on Step 1: gateway binding and SSH tunneling
- OpenClaw Skill Audit — Step 4 walkthrough with VirusTotal scanning
- OpenClaw Security Risks Explained — The full threat landscape and what attackers do
- OpenClaw Security Checklist — Companion checklist with additional protections
- How to Update OpenClaw Without Breaking Your Setup — Step 7 backup and rollback procedure