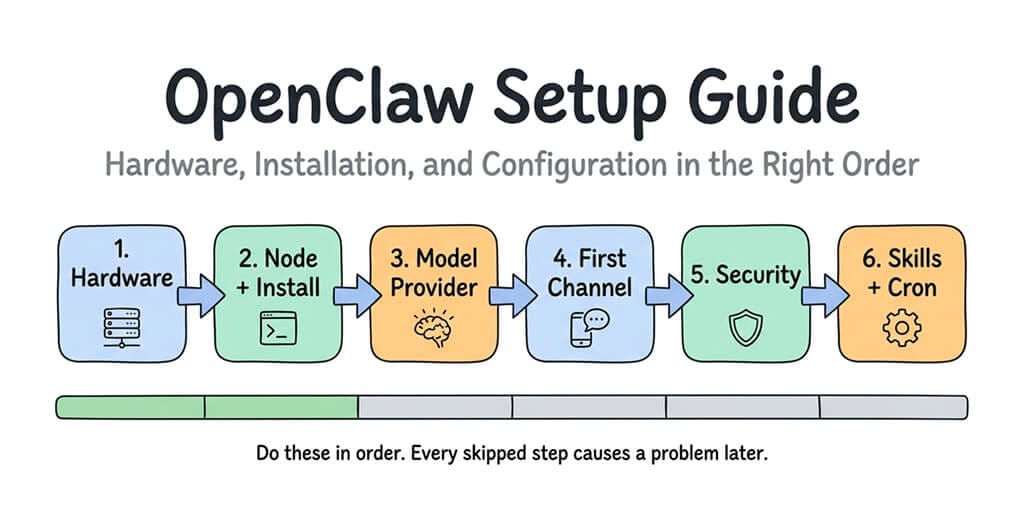
Every other guide skips steps or puts them in the wrong sequence. This one doesn't.
I followed three different OpenClaw setup guides before I got a working agent. The first one skipped the security steps entirely. The second one had me configuring channels before I'd even picked a model. The third one was written for a version that no longer existed.
The order matters. Do things out of sequence and you'll spend hours debugging problems that wouldn't exist if you'd just done Step 3 before Step 5.
This OpenClaw setup guide puts everything in the right order. Hardware first. Then Node. Then model provider. Then your first channel. Then security. Then skills and automation. Each step builds on the previous one. No backtracking.
Whether you're setting up on a Mac Mini, a VPS, or a managed platform, the sequence is the same. The commands change. The logic doesn't.
Step 1: Pick your hardware (and understand what you're actually choosing)
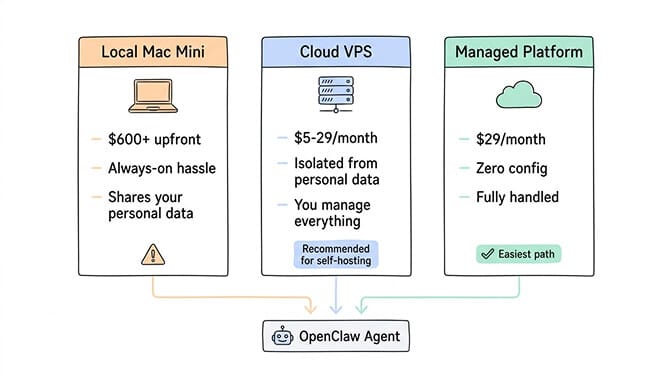
You have three paths. Each has a different cost, complexity, and maintenance profile.
Path A: Local machine (Mac Mini or laptop). $600+ upfront for a Mac Mini M4 with 16GB RAM. Runs on your desk. Always-on requires an app like Amphetamine to prevent sleep. Your personal files and accounts share the same machine as the agent. This is the path most YouTube tutorials show. It's also the one Microsoft's security blog explicitly recommends against.
Path B: Cloud VPS. $5-29/month. Hetzner, Contabo, DigitalOcean, Hostinger, OVHcloud. Isolated from your personal data. Always-on by default. You manage the server, security, Docker, and updates yourself. Minimum specs: 2 vCPU, 2GB RAM (4GB recommended for browser automation).
Path C: Managed platform. $49/month for Pro (Better Claw), $49/month (ClawHosted). Zero infrastructure management. Deploy in under 60 seconds. Security, updates, and monitoring handled for you.
If you choose Path A or B, keep reading. If you choose Path C, skip to the "What to do after your agent is live" section at the end.
For a detailed comparison of self-hosted vs managed OpenClaw deployment, our comparison page covers the full tradeoff matrix.
Choose VPS over local machine. The isolation alone is worth $5/month. Running an autonomous agent on the same computer where you do your banking is a risk most security researchers consider unacceptable.
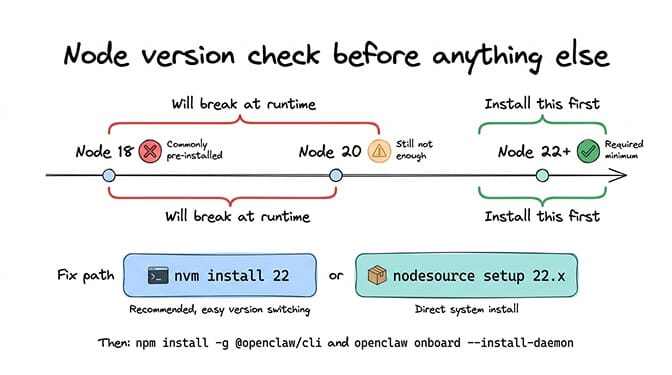
Step 2: Install Node.js 22+ (the requirement nobody mentions first)
Before you touch OpenClaw, you need Node.js 22 or higher. Not 18. Not 20. Twenty-two.
Most systems come with an older version. Check yours:
node --version
If it's below 22, upgrade:
# Using nvm (recommended)
curl -o- https://raw.githubusercontent.com/nvm-sh/nvm/v0.40.0/install.sh | bash
source ~/.bashrc
nvm install 22
nvm use 22

# Or using nodesource
curl -fsSL https://deb.nodesource.com/setup_22.x | sudo -E bash -
sudo apt-get install -y nodejs
Now install OpenClaw:
npm install -g @openclaw/cli
Run the onboarding wizard:
openclaw onboard --install-daemon
The --install-daemon flag sets up OpenClaw to run automatically in the background, even after restarts. Without it, your agent dies every time you close your terminal.
The wizard walks you through model provider selection and your first channel. But here's the thing: the wizard's defaults aren't always the right defaults. The next two steps explain what to choose and why.
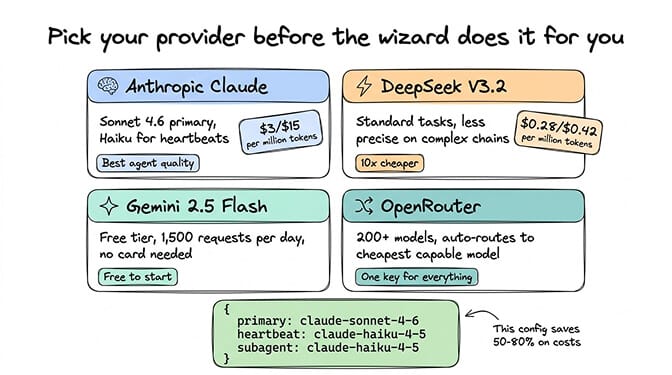
Step 3: Choose your model provider (this decision controls your monthly bill)
The onboarding wizard asks for your AI provider. This is the single most important cost decision you'll make.
If you want the best agent performance: Anthropic (Claude). Sonnet 4.6 at $3/$15 per million tokens is the community consensus best balance of quality and price for agent tasks. Set it as primary. Use Haiku ($1/$5) for heartbeats and sub-agents.
If you want the cheapest possible setup: DeepSeek V3.2 at $0.28/$0.42 per million tokens. 10x cheaper than Claude. Genuinely capable for standard tasks. Tool calling is less precise on complex chains.
If you want free: Google Gemini 2.5 Flash through Google AI Studio. Free tier: 1,500 requests/day. No credit card needed.
If you want one key for everything: OpenRouter. Access 200+ models. Auto-routing picks the cheapest capable model per request. Small markup (under 5%).
For the full pricing breakdown and which models cost what for specific agent tasks, our comparison covers real cost-per-task data across four providers.
Set up model routing from the start. Don't run everything on your primary model:
{
  "agent": {
    "model": {
      "primary": "anthropic/claude-sonnet-4-6",
      "heartbeat": "anthropic/claude-haiku-4-5",
      "subagent": "anthropic/claude-haiku-4-5"
    }
  }
}
This single config change saves 50-80% on API costs compared to running everything on Sonnet.
Step 4: Connect your first channel (start with Telegram, seriously)
The wizard offers multiple channels. Pick Telegram first. Always Telegram first.
Why? It's the fastest to set up (under 10 minutes), has the simplest authentication flow, and debugging is straightforward. Once your agent responds on Telegram, you know the core pipeline works. Then add other channels one at a time.
Telegram setup:
- Open Telegram. Search for @BotFather. Send
/newbot. Give it a name and username (must end in_bot). Copy the bot token. - Search for @userinfobot. Click "Start." Copy your numeric user ID.
- The wizard asks for both. Paste them in.
- Send your bot a message. If it responds, you're golden.
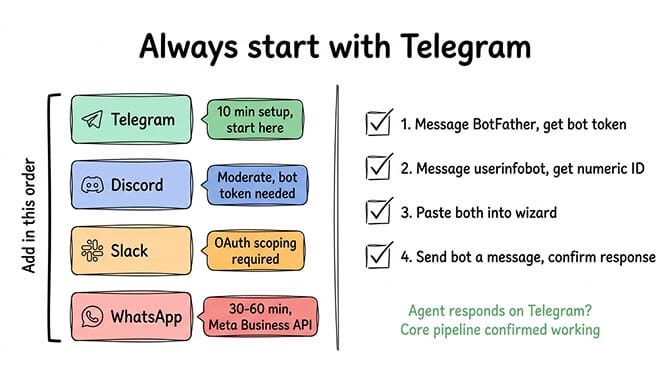
After Telegram works, add other channels. WhatsApp requires Meta's Business API (budget 30-60 minutes). Slack needs OAuth configuration with specific scopes. Discord wants a bot token from the Developer Portal.
Each channel is an independent authentication flow. If one fails, it doesn't affect the others.
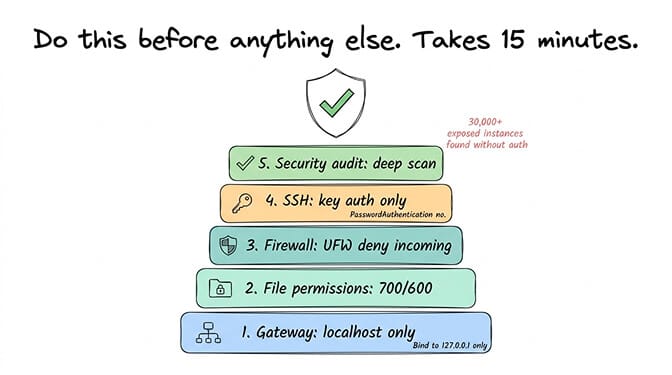
Step 5: Security hardening (the step most guides save for "later" and users never do)
Here's what nobody tells you about the OpenClaw setup process: the default configuration is not secure. The installer gets you running. It doesn't get you safe.
This step takes 15-20 minutes. Skipping it puts your API keys, your connected accounts, and your server at risk. Researchers found 30,000+ internet-exposed OpenClaw instances without authentication. Don't be one of them.
The minimum security checklist:
Bind gateway to localhost:
openclaw configure
# Select "Local (this machine)"
Verify: ss -tlnp | grep 18789 should show 127.0.0.1:18789.
Set file permissions:
chmod 700 ~/.openclaw
chmod 600 ~/.openclaw/openclaw.json
If on a VPS, configure the firewall:
sudo ufw default deny incoming
sudo ufw default allow outgoing
sudo ufw allow 22/tcp
sudo ufw limit 22/tcp
sudo ufw enable
Disable SSH password authentication (VPS only):
In /etc/ssh/sshd_config, set PasswordAuthentication no. Restart sshd.
Run the built-in security audit:
openclaw security audit --deep
For the complete 10-step hardening process, our OpenClaw security risks guide covers every documented vulnerability and the specific config to address each one.
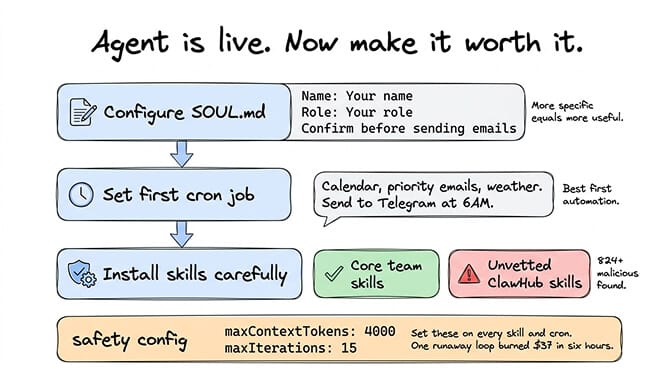
Step 6: Skills, cron jobs, and making it actually useful
Your agent is running. It responds on Telegram. It's secured. Now make it do something worth the setup time.
Configure your SOUL.md
This file in your workspace defines your agent's personality and context. Give it your name, your preferences, your work context. The more specific, the better.
# About the User
Name: [Your name]
Role: [Your role]
Communication style: Concise, direct, no fluff.
Timezone: [Your timezone]

# Agent Behavior
Default to brief responses unless I ask for detail.
Always confirm before sending emails or modifying files.
Set up your first cron job
A morning briefing is the best first automation. Set it to run at 6:00 AM:
"Check my calendar for today, summarize any priority emails from overnight, and check the weather. Send the summary to Telegram."
This runs daily without prompting. You wake up to useful information.
Install skills carefully
The ClawHub marketplace has 13,700+ skills. It also had 824+ malicious ones (roughly 20% of the registry at one point). Cisco found a skill performing data exfiltration without user awareness.
Before installing any skill: read the source code, check the publisher's reputation, search for the skill name in GitHub issues. Start with skills maintained by the OpenClaw core team.
For a curated list of community-vetted OpenClaw skills that are safe and genuinely useful, our skills guide ranks the best options.
Set cost and safety limits
On every skill and cron job:
{
  "maxContextTokens": 4000,
  "maxIterations": 15
}
Set daily spending caps on your API provider. A runaway agent loop can burn through $37 in six hours (documented community incident) or $3,600 in a month (another documented case).
For the complete picture of how API costs accumulate and how to cap them, our cost guide covers five specific optimizations.
What to do after your agent is live
Once you've completed all six steps, your agent is running, secured, and doing useful work. Here's the maintenance rhythm:
Weekly: Run npm update -g @openclaw/cli to stay current on patches. The project had three CVEs in a single week in early 2026. Check your API provider dashboard for unexpected cost spikes.
Monthly: Review your model routing. New models launch frequently. What was the cheapest option last month may not be this month. DeepSeek, Gemini Flash, and Haiku pricing all shifted in 2026.
Ongoing: Monitor your gateway logs at /tmp/openclaw/openclaw-[date].log. Set up a simple health check (a cron job that pings a monitoring service if the gateway is running). If the gateway starts crashing on boot with a Cannot read properties of undefined (reading 'trim') error, it's almost always a stale sessions.json from an interrupted update — a two-minute fix once you know where to look.
The honest time estimate
For a developer comfortable with command line, VPS, and Docker:
- Steps 1-2 (hardware + install): 30-60 minutes
- Step 3 (model provider): 15 minutes
- Step 4 (first channel): 10-15 minutes (Telegram) to 60 minutes (WhatsApp)
- Step 5 (security): 15-20 minutes
- Step 6 (skills + cron): 30-60 minutes
Total: 2-4 hours for a production-ready, secured agent.
For someone learning as they go, double that. Budget a full weekend.
For the managed path: under 2 minutes from signup to a live agent. No steps 1, 2, or 5. Model provider and channel configuration still take the same time because those are account-level decisions regardless of hosting.
The setup isn't hard. It's just longer than the README suggests. And the order matters more than any individual step.
If you've gone through this guide and decided the infrastructure isn't how you want to spend your time, give Better Claw a try. $49/month for Pro, BYOK, 60-second deploy. We handle steps 1, 2, and 5 entirely. You handle the parts that are actually interesting: choosing your model, connecting your channels, and building workflows.
Frequently Asked Questions
What hardware do I need for an OpenClaw setup?
Minimum: 2 vCPU, 2GB RAM, 10GB storage. Recommended: 4GB RAM for browser automation. You can run on a local Mac Mini ($600+ upfront), a cloud VPS ($5-29/month), or a managed platform ($49/month for Pro). Security researchers recommend VPS or managed over local machines because of the isolation between your personal data and the autonomous agent.
How does self-hosted OpenClaw compare to managed platforms like Better Claw?
Self-hosted gives you full control but requires 2-4 hours of initial setup, ongoing security patching, server maintenance, and Docker management. Better Claw deploys in under 60 seconds with built-in Docker sandboxing, AES-256 encryption, and anomaly detection. Both use BYOK for API costs. The tradeoff is control vs convenience, and $5-10/month in VPS costs vs $49/month for zero maintenance.
How long does OpenClaw installation take from scratch?
For an experienced developer: 2-4 hours for a fully configured, secured, multi-channel agent. For beginners: 4-8 hours spread across setup, troubleshooting, and security hardening. The biggest time sinks are WhatsApp Business API configuration (30-60 minutes), security hardening (15-20 minutes), and debugging Node version or Ollama discovery issues.
How much does it cost to run OpenClaw after setup?
API costs with smart model routing (Sonnet primary, Haiku heartbeats): $15-50/month. Without routing (everything on Opus/GPT-4o): $80-200/month. Hosting: $5-19/month (VPS vs managed). The first cost optimization to implement is model routing: assign cheap models to heartbeats and sub-agents. This single change saves 50-80%.
Is OpenClaw safe to install on my personal computer?
OpenClaw's own maintainer warned that it's "far too dangerous" for users unfamiliar with command-line security. Microsoft recommends running it only in fully isolated environments. CrowdStrike published enterprise risk advisories. If you install on a personal machine, the agent has access to your files, accounts, and system. A VPS ($5/month) or managed platform ($49/month for Pro) provides isolation that protects your personal data from agent errors or security compromises.