The full guide to building OpenClaw from the GitHub repo. Plus the honest answer about whether you actually need to.
I cloned the OpenClaw repo for the first time because I wanted to understand what the gateway actually does under the hood. The TypeScript source. The plugin system. The channel routing. I wanted to read the code before I trusted it with my API keys.
Two hours later, I had a working dev build. Three days later, I'd read enough of the codebase to understand why certain design decisions were made and where the security surface lives. That understanding has shaped everything we've built at BetterClaw since.
If you're a developer who wants to build OpenClaw from source, whether to contribute, debug, customize, or just learn, this is the guide. It covers the git clone, the build process, the common failures, and the honest assessment of when building from source makes sense versus when it doesn't.
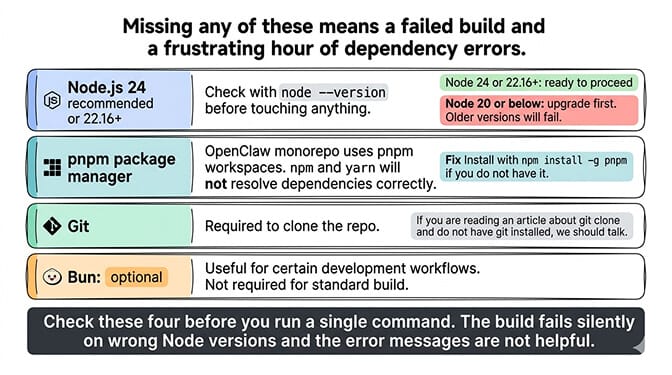
Prerequisites (check these before you clone)
OpenClaw's source build requires specific tooling. Missing any of these means a failed build and a frustrating hour of debugging dependency errors.
Node.js 24 (recommended) or Node.js 22.16+. Older Node versions will fail. Check with node --version. If you're on Node 20 or below, upgrade before touching anything.
pnpm as the package manager. OpenClaw's monorepo uses pnpm workspaces. npm and yarn won't resolve dependencies correctly. Install with npm install -g pnpm if you don't have it.
Git (obviously). You need git to clone the repo. If you're reading an article about git clone and don't have git installed, we should talk.
Bun (optional). Bun can run TypeScript directly and is useful for certain development workflows, but it's not required for the standard build.
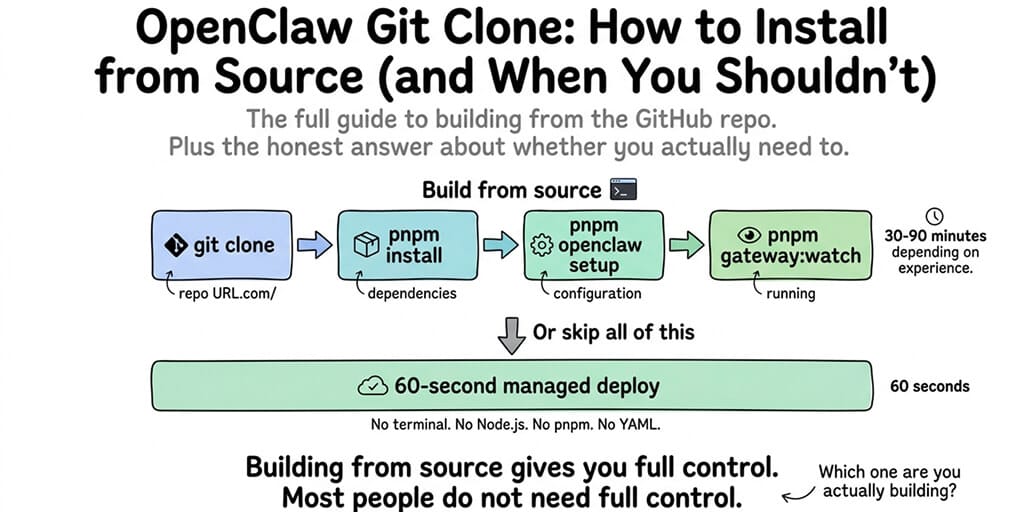
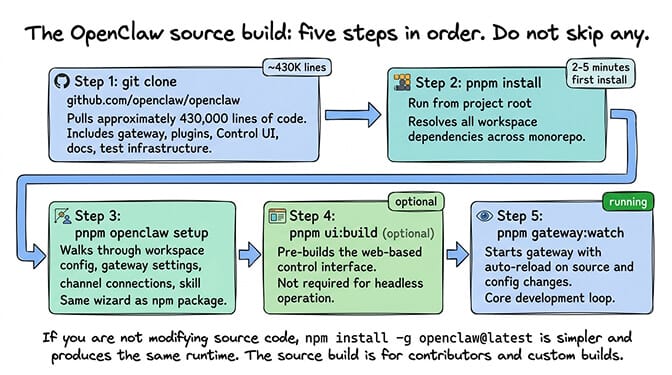
The git clone and build process
The OpenClaw source build follows a standard monorepo pattern. Clone, install dependencies, run setup, start the dev server.
Step 1: Clone the repository. The OpenClaw git clone pulls approximately 430,000 lines of code from the main repository at github.com/openclaw/openclaw. The repo includes the gateway, all bundled plugins, the Control UI, documentation, and test infrastructure.
Step 2: Install dependencies with pnpm. Run pnpm install from the project root. This resolves all workspace dependencies across the monorepo. First install takes 2-5 minutes depending on your network speed.
Step 3: Run the setup wizard. pnpm openclaw setup walks you through configuring your workspace, gateway settings, channel connections, and initial skill selection. This is the same setup wizard that the npm package uses, but running against your local source build.
Step 4: (Optional) Build the Control UI. Run pnpm ui:build to pre-build the web-based control interface. This isn't required for headless operation but is useful if you want the browser dashboard.
Step 5: Start the development gateway. pnpm gateway:watch starts the gateway with auto-reload on source and config changes. Every time you edit a file, the gateway restarts with your changes. This is the core development loop.
For the complete setup guide including non-source installation, our setup post covers the npm install path that most users should start with.
The source build gives you auto-reload on file changes, which is essential for development. If you're not modifying the source code, the npm global install (npm install -g openclaw@latest) is simpler and produces the same runtime.
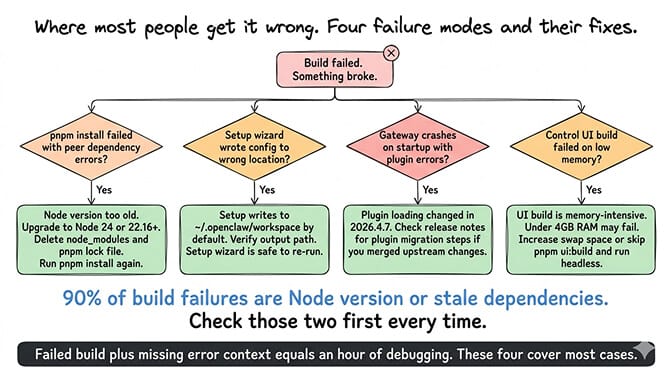
Where the git clone build breaks (and the fixes)
Here's where most people get it wrong.
pnpm install fails with peer dependency errors. This usually means your Node version is too old. OpenClaw requires Node 24 (recommended) or 22.16+. The fix: upgrade Node, delete node_modules and the pnpm lock file, run pnpm install again.
pnpm openclaw setup writes config to the wrong location. The setup wizard writes to ~/.openclaw/workspace by default. If you're running multiple OpenClaw instances or working with a forked config, verify the output path. The setup wizard is safe to re-run if you need to change settings.
pnpm gateway:watch crashes on startup with plugin errors. After the 2026.4.7 release, plugin loading changed to use manifest-declared activation. If you cloned an older branch and merged upstream changes, some plugin configs may be incompatible. Check the release notes for plugin migration steps. For the 2026.4.7 update details including what breaks, our update guide covers the specific plugin changes.
The Control UI build fails on low-memory systems. The UI build is memory-intensive. Systems with less than 4GB RAM may fail during the webpack build step. The fix: increase swap space, or skip the UI build (pnpm ui:build) and use the gateway in headless mode.
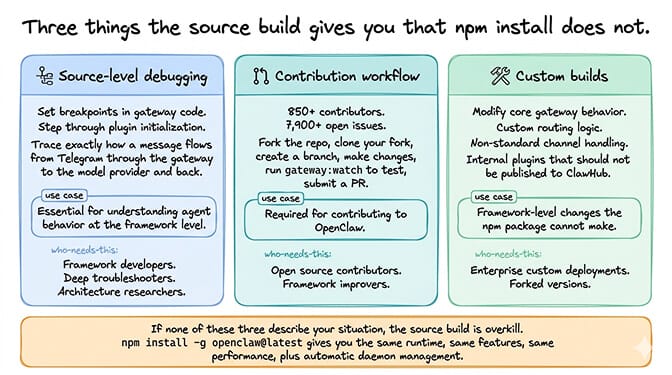
What building from source actually gives you
The OpenClaw git clone gives you three things the npm install doesn't.
Source-level debugging. You can set breakpoints in the gateway code, step through plugin initialization, and trace exactly how a message flows from your Telegram bot through the gateway to the model provider and back. This is invaluable for understanding agent behavior at the framework level.
Contribution workflow. If you want to contribute to OpenClaw (850+ contributors, 7,900+ open issues), you need a source build. Fork the repo, clone your fork, create a branch, make changes, run pnpm gateway:watch to test, submit a PR.
Custom builds. If you need to modify core gateway behavior (custom routing logic, non-standard channel handling, internal plugins that shouldn't be published), the source build lets you make framework-level changes that the npm package can't.
When building from source is the wrong approach
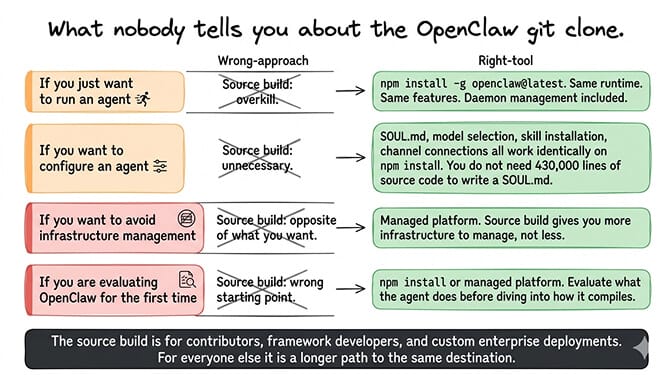
Here's what nobody tells you about the OpenClaw git clone.
If you just want to run an agent, the source build is overkill. The npm global install (openclaw onboard --install-daemon) gives you the same runtime, the same features, and the same performance. It also installs the system daemon so the gateway runs automatically in the background. The source build doesn't do this. You manage the process yourself.
If you want to configure an agent, you don't need the source. SOUL.md, model selection, skill installation, channel connections, memory configuration. All of this works identically on the npm install. You don't need 430,000 lines of source code to write a SOUL.md.
If you want to avoid infrastructure management entirely, building from source is the opposite of what you want. The source build gives you more infrastructure to manage, not less.
If you're evaluating OpenClaw and realized you'd rather configure your agent than compile its source code, BetterClaw eliminates the build and infrastructure entirely. Free tier with 1 agent and BYOK. $29/month per agent for Pro. 60-second deploy. Smart context management, verified skills, secrets auto-purge. The platform handles the 430,000 lines of code so you handle the SOUL.md.
The honest recommendation
The OpenClaw git clone makes sense for three types of developers: contributors who want to submit PRs, developers who need source-level debugging to diagnose framework behavior, and builders who need custom gateway modifications.
For everyone else, the npm install is the right starting point. It produces the same runtime, supports the same features, and requires significantly less tooling.
For the broader decision of whether to self-host at all, our comparison covers the ten scenarios where self-hosting makes sense and the ten where it doesn't.
The source build isn't the hard part. The hard part is everything that comes after: gateway security, skill supply chain risk (1,400+ malicious skills on ClawHub), credential protection, update management, and the ongoing time cost of maintaining a production agent. The git clone takes 30 seconds. The infrastructure management takes indefinitely.
If you want the agent without the infrastructure, give BetterClaw a try. Free tier with 1 agent and BYOK. $49/month for Pro (5 agents included) with full access. 60-second deploy. Verified skills. Secrets auto-purge. Smart context management. We handle the 430,000 lines of TypeScript. You handle the interesting part: what your agent actually does.
Frequently Asked Questions
How do I install OpenClaw from source using git clone?
Clone the repo with git clone from github.com/openclaw/openclaw, then run pnpm install for dependencies, pnpm openclaw setup for configuration, and pnpm gateway:watch to start the development server. Prerequisites: Node.js 24 (or 22.16+) and pnpm. The full process takes 15-30 minutes including the first dependency install.
What's the difference between git clone and npm install for OpenClaw?
The npm global install (npm install -g openclaw@latest) gives you the compiled runtime ready to use. The git clone gives you the full 430,000-line source codebase with auto-reload development mode, source-level debugging, and the ability to modify framework code. Both produce the same runtime agent. The source build is for developers contributing to the project or building custom modifications. The npm install is for everyone else.
What Node.js version does OpenClaw require?
Node.js 24 (recommended) or Node.js 22.16+. Older versions (Node 20 and below) will fail during pnpm install with peer dependency errors. Check with node --version before cloning. If you need to upgrade, use nvm (Node Version Manager) or download directly from nodejs.org.
How long does an OpenClaw source build take?
The git clone itself takes 30-60 seconds. pnpm install takes 2-5 minutes on first run. pnpm openclaw setup takes 5-10 minutes (interactive). pnpm ui:build takes 2-5 minutes for the Control UI. Total: approximately 15-30 minutes for a complete source build. Subsequent builds after code changes are near-instant due to pnpm gateway:watch auto-reload.
Should I build OpenClaw from source or use BetterClaw?
Build from source if you want to contribute to the OpenClaw project, need source-level debugging, or require custom gateway modifications. Use BetterClaw if you want a working agent without managing infrastructure. BetterClaw deploys in 60 seconds versus the source build's 15-30 minutes, includes verified skills (eliminates ClawHub supply chain risk), secrets auto-purge, and smart context management. Free tier with 1 agent and BYOK. $29/month for Pro.