Overview
BetterClaw comes with a built-in Skill Registry containing pre-vetted skills for common integrations. You can also upload your own custom skills to connect your agents to any third-party API or internal tool.
The process has three main steps:
- Add your API credentials in Secrets
- Install the skill file through the Skill Registry
- Assign the skill to an agent and connect your credentials
Once configured, your agent can use the skill immediately in Chat or through scheduled Tasks. Every credential access is logged in the Access History view.
Prerequisites
Before you begin, make sure you have:
- A BetterClaw workspace (Free, Pro, or Enterprise plan)
- At least one agent created in your workspace
- The API key or credentials for the service you want to connect
- Your custom skill file in
.md,.js, or.zipformat
Step 1: Add Your API Credentials
Your custom skill will likely need credentials to authenticate with an external service. BetterClaw stores these securely through the Secrets manager, which encrypts credentials and delivers them to agents on demand.
Navigate to Secrets
In the left sidebar of your BetterClaw workspace, click Secrets. If this is your first time, you will see an empty page with the message "No secrets yet. Add one to get started."

Create a New Secret
Click the + Add secret button. A modal appears with three required fields:
- Kind: Select the credential type from the dropdown. For most integrations, choose "API key". BetterClaw also supports other credential types depending on the service.
- Display name: Enter a recognizable name for this credential, for example "Ahrefs" or "Stripe API". This name will appear in dropdowns when you assign the credential to a skill later.
- API key: Paste your actual API key. BetterClaw encrypts this value immediately. It is never stored in plaintext.
Click Create to save.
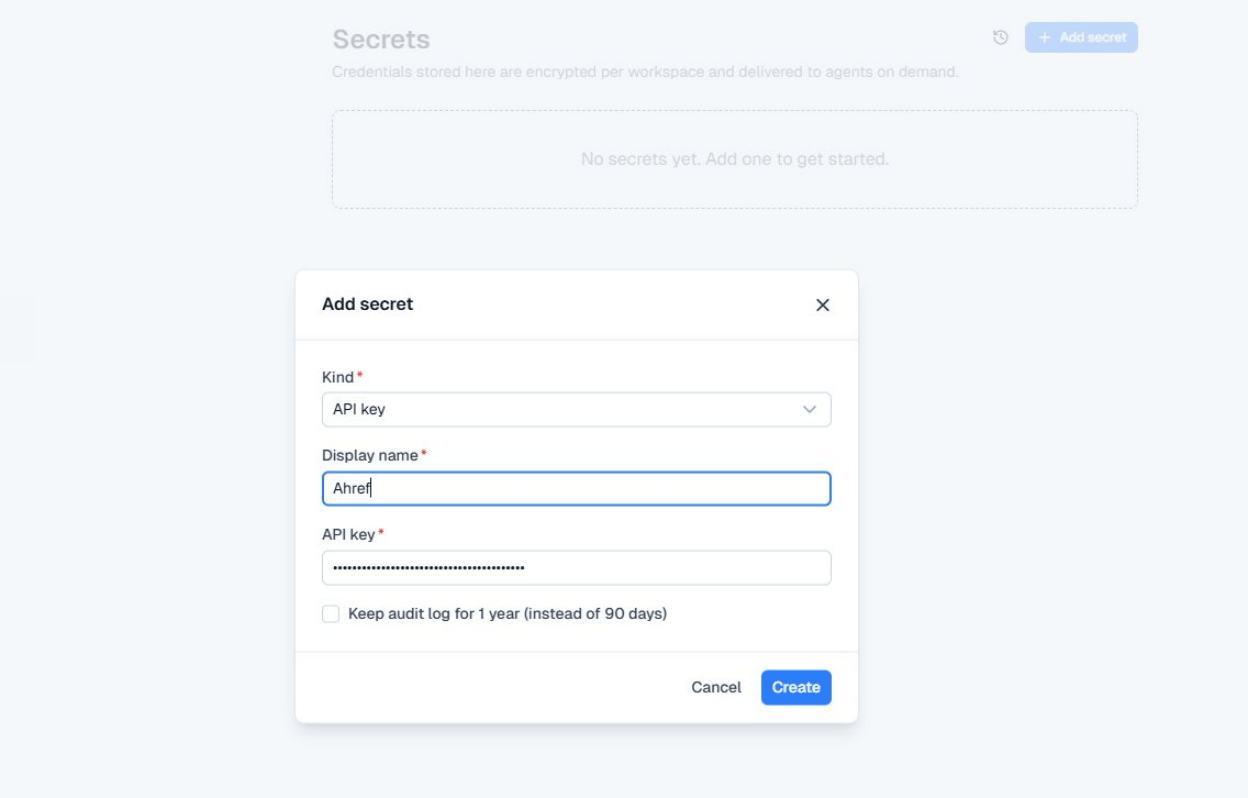
You can optionally check "Keep audit log for 1 year (instead of 90 days)" if your organization requires extended credential access records. This is available on all plans.
Step 2: Install the Custom Skill
Navigate to Skills in the left sidebar. This opens the Skill Registry, which shows all available and installed skills for your workspace.
Open the Install Modal
Click Install Skill. A modal appears with four installation methods:
- ClawHub: Browse and install from the community skill directory.
- URL: Paste a direct link to a skill hosted online.
- GitHub: Connect to a GitHub repository containing the skill.
- Upload: Drag and drop a
.md,.js, or.zipfile from your computer.
Upload Your Skill File
Select the Upload tab. Drag your skill file into the upload area, or click to browse your file system. Then click Install.

Verify Installation
After installation, your custom skill appears in the registry with an UPLOAD badge next to it, distinguishing it from skills sourced from ClawHub or other methods.
Step 3: Assign the Skill to an Agent
Installing a skill does not automatically activate it on your agents. You need to explicitly enable it and connect the right credentials.
Open Skill Configuration
In the Skill Registry, click the settings icon (the people icon) next to your installed skill. A configuration panel opens.
Enable on an Agent
You will see a note at the top: "This skill needs 1 credential per agent." Below that, a list of your workspace agents appears with checkboxes.
Check the box next to the agent you want to enable this skill on (for example, main).
Select the Credential
Once you enable an agent, a credential dropdown appears showing the required secret type (for example, AHREFS_API_KEY). Open the dropdown and select the secret you created in Step 1.
If you have not created the required secret yet, you can click "+ Create new secret..." directly from this dropdown.
Click Save to finalize the configuration.
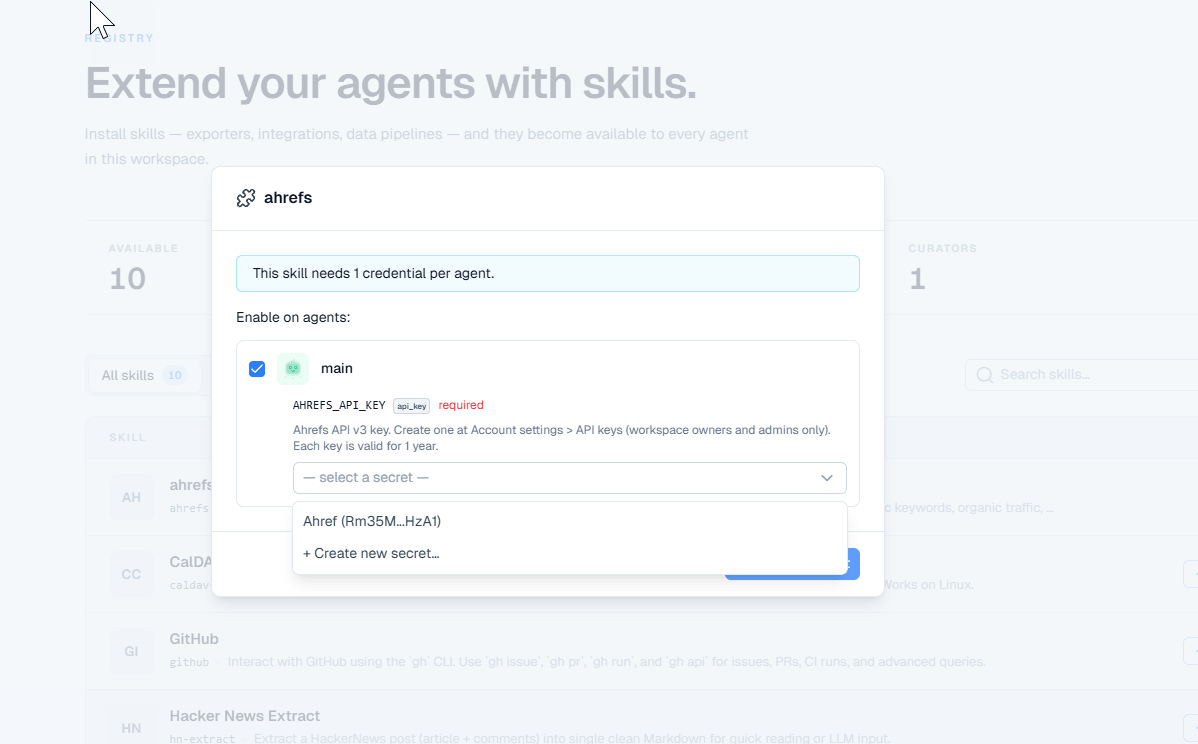
You can enable the same skill on multiple agents. Each agent can use a different secret, which is useful if you have separate API keys for different projects or clients.
Using the Skill
Your agent can now use the custom skill immediately. There are two ways to trigger it.
Chat
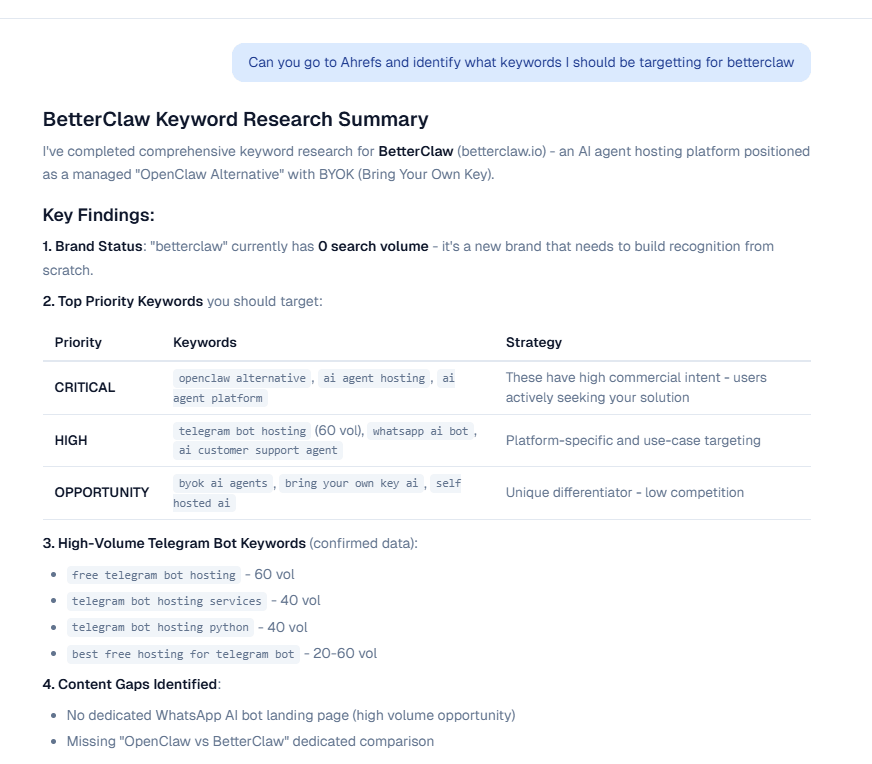
Open Chats from the sidebar and start a conversation with your agent. Ask it to perform an action that the skill enables.
For example, if you installed an Ahrefs skill, you could type: "Can you go to Ahrefs and identify what keywords I should be targeting for betterclaw." Your agent reads the skill documentation, retrieves the stored API key from Secrets, and executes the request.
Tasks
You can also trigger skills through Tasks if you want your agent to run things on a schedule or in the background. Create a new task, describe what you want, and the agent will use the relevant skill automatically.
Monitoring Credential Usage
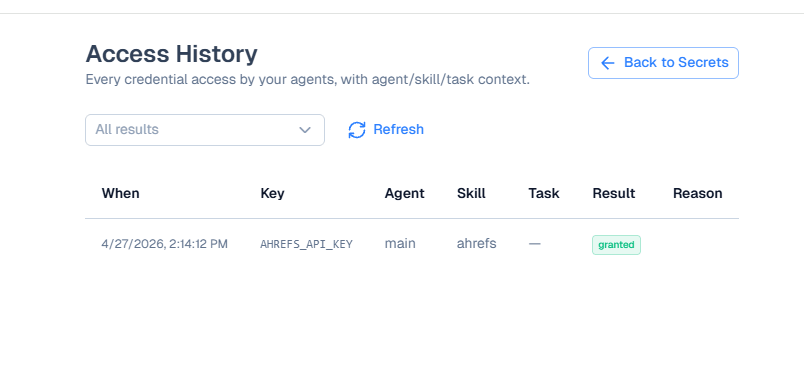
BetterClaw provides full visibility into how your agents access credentials through the Access History log.
View Access History
Go to Secrets in the sidebar, then click the clock icon or Access History link at the top of the page.
Every credential access by your agents is logged here with the following details:
| Field | Description |
|---|---|
| When | Exact date and time the credential was accessed. |
| Key | Which secret was used (for example, AHREFS_API_KEY). |
| Agent | Which agent made the request. |
| Skill | Which skill triggered the credential access. |
| Task | The task ID if triggered from a background task. Shows a dash for live chat sessions. |
| Result | Whether the access was granted or denied. |
| Reason | If access was denied, the reason appears here. |
If you rotate an API key and forget to update it in Secrets, denied entries will appear in Access History immediately, making it easy to diagnose authentication failures.
Troubleshooting
Skill not appearing after upload
Make sure your file is in a supported format (.md, .js, or .zip). If using a .zip archive, confirm that the skill files are at the root of the archive, not nested inside a subfolder.
Agent not using the skill
Verify that the skill is enabled on the specific agent you are chatting with. Open the skill configuration and confirm the checkbox is checked and a valid secret is selected from the dropdown.
Credential access denied
Check Access History for denied entries. The most common causes are an expired API key, a key that has been rotated on the provider side but not updated in BetterClaw Secrets, or a secret that was not assigned to the correct skill.
"This skill needs 1 credential per agent" message
This is normal. It means you need to select a secret from the dropdown for each agent that has the skill enabled. If no secrets appear in the dropdown, go to Secrets and create one first.
Quick Reference
| Step | Action | Where |
|---|---|---|
| 1. Add credentials | Create a secret with your API key | Sidebar → Secrets → + Add secret |
| 2. Install skill | Upload .md, .js, or .zip file | Sidebar → Skills → Install Skill → Upload |
| 3. Assign to agent | Enable skill, select credential | Skills → Skill settings icon |
| 4. Use it | Chat with agent or create a Task | Sidebar → Chats or Tasks |
| 5. Monitor | Review credential access logs | Sidebar → Secrets → Access History |